

Maintaining operational continuity and user satisfaction with minimal downtime is critical in today's fast-paced digital ecosystem. This article delves into blue-green deployment, an effective strategy designed for application updates with zero downtime. Tailored for DevOps professionals and system administrators, this article specifically focuses on one approach among several using Docker Swarm, NGINX, single Docker Compose file, all within a CI/CD pipeline.
What is Blue-Green Deployment Approach?
Blue and green deployment method involves maintaining the current version of the application actively serving user requests, while simultaneously setting up a new version in the background. During the deployment process, two versions of the application run concurrently, i.e. blue & green, therefore it is named like that.
How does it help in Reducing Downtime?
This approach ensures that users continue to experience uninterrupted service without any downtime. The new version is deployed in isolation without affecting the live environment. Here's how it helps in achieving that :
During the rollout of the new version, all the user traffic is strictly redirected to the existing stable version. This means that any issues arising from the deployment of the new version do not impact users, as they are still interacting with the fully functional old version.
If any issues or failures occur during the deployment of the new version, then the existing old version continues to serve the user requests without any interruption and the operations teams can proactively manage and resolve deployment issues without the pressure of live service disruption.
Before switching traffic to the new version, it undergoes a series of rigorous health checks. These checks verify that the new version is fully operational and capable of handling live traffic. Only after passing these checks is the new version considered ready for production. Once the new version passes all the necessary health checks and is fully prepared to handle the traffic, then all the incoming user requests are redirected to it, and the old version is phased out.
Why "docker-compose up" is not ideal for Blue-Green Deployments?
To update the containers with the new version, generally, people just use this command.
docker compose up -d
OR
docker compose up -d --build --force-recreate
Believe me its totally fine, if you have a small user base, private website or you can afford to have downtimes. The compose up command not only instantiates the containers but also recreates them if any changes are detected. For instance, if I modify the compose file to switch from version 1 to version 2, running docker compose up will automatically pull the latest update and recreate the container with the new version.
But here's the catch. When this method is used, the old containers are stopped and then the new ones are created, resulting in a short period where the application is basically down. Although this downtime is minimal, but it is still problematic as it can disrupt the user experience if someone is using the application at that exact moment.
Additionally, another issue with using the traditional compose up is that, it forces the new version over the old one, meaning it destroys the old version without verifying if the new version is stable, bug-free, and passes health checks. This can lead to potential issues if the new version has not been thoroughly vetted. If god forbids, for some reason the new version didn't workout as expected, then the rollback is again a manual step which becomes a headache overtime.
Possible ways to achieve blue-green deployments
There is no such single straight forward method of doing it. A lot of people simply create separate compose files for blue and green services and use traditional compose up method. Some people also manage this through orchestration tools like Kubernetes, and some use cloud managed services like AWS ECS, GCP Code Deploy, etc for achieving blue green deployments.
In this article, I'll demonstrate, how we can use basic docker swarm, single compose file, nginx and a ci/cd pipeline to achieve this.
What is Docker Swarm?
Docker Swarm is an open source container orchestration platform built and maintained by Docker. It converts multiple docker instances into a single virtual host. It helps in deploying and managing multi-container applications across a swarm of machines, providing high availability, scalability, and fault tolerance.
Important concepts
This will give some basic idea regarding docker swarm and the commands which will be used later in this article, i.e. docker stack deploy and docker service scale. These are the official documentation links published by docker itself.
- Docker stack deploy: This command helps to deploy a new stack or update an existing stack i.e. a collection of services that define how to run a group of interrelated containers within the swarm cluster
- Docker service scale: This command helps to scale one or more services either up or down to the desired number of replicas.
Basic Architecture Diagram
List of resources used for this demonstration:
- One ubuntu 22.04 virtual machine
- Docker for containerization
- Docker hub repository for storing docker images
- Docker swarm for managing the containers and ensuring blue green deployments
- Nginx for internal load balancing and reverse proxy (If we want to do this setup on multiple vm's then we can use one external ALB and one internal load balancer for each vm like nginx or Apache)
- Certbot for generating ssl certificates (use this only if https is required)
- GitHub workflows for CI/CD
.jpg)
Setup inside the Virtual Machine
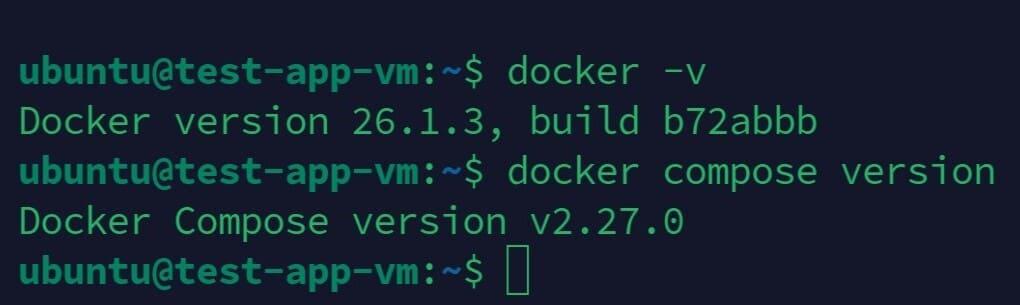
1. Update system (ubuntu)
sudo apt update2. Install docker and compose plugin
curl -fsSL https://get.docker.com/ -o get-docker.sh
sudo sh get-docker.sh
sudo apt-get install docker-compose-plugin
3. Initialize docker swarm
sudo docker swarm init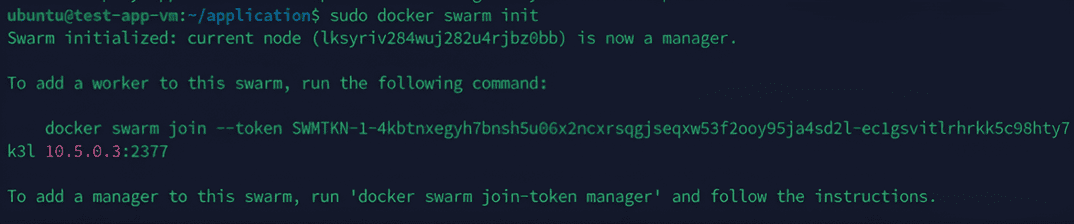
4. Create project directory and other necessary files
# Create project directory for storing all files related to the application at one place
mkdir application
# Go inside the directory to create other files
cd application
4.1 Create compose file
The compose file contains configuration of these services:
- frontend_green
- frontend_blue
- backend_green
- backend_blue
- mssql database - (use cloud managed databases instead of docker containers for prod environments)
nano docker-compose-server-bluegreen.yml
# Paste the below content inside this and for saving the changes, press Ctrl+O , then press Enter & then Ctrl+X
# THIS IS THE COMPOSE FILE WHICH CONTAINS CONFIGURATIONS OF ALL THE SERVICES
# THIS COMPOSE WILL BE USED TO START ALL THE SERVICES FOR THE FIRST TIME
# COMMAND TO DEPLOY THIS STACK -> sudo docker stack deploy -c <compose_file_name> -d --with-registry-auth <stack name>

version: '3.9' # Choose a version that supports docker swarm
services:

  # FRONTEND SERVICES

  frontend_blue:
    image: saquibmansuri30/chat-application:frontend-latest # This image will be only used for the first deployment
    env_file:
      - fe.env # This file contains environment variables for frontend application
    deploy:
      mode: replicated
      replicas: 1 # Set this to desired number of tasks
    ports:
      - "4200:80" # Host port should not be clashing with any other port on the machine

  frontend_green:
    image: saquibmansuri30/chat-application:frontend-latest # This image will be only used for the first deployment
    env_file:
      - fe.env # This file contains environment variables for frontend application
    deploy:
      mode: replicated
      replicas: 1 # Set this to desired number of tasks
    ports:
      - "4201:80" # Host port should not be clashing with any other port on the machine

  ###################################

  # BACKEND SERVICES

  backend_blue:
    image: saquibmansuri30/chat-application:backend-latest #This image will be only used for the first deployment
    env_file:
      - be.env # This file contains environment variables for backend application
    deploy:
      mode: replicated
      replicas: 1 # Set this to desired number of tasks
    ports:
      - "7218:80" # Host port should not be clashing with any other port on the machine

  backend_green:
    image: saquibmansuri30/chat-application:backend-latest #This image will be only used for the first deployment
    env_file:
      - be.env # This file contains environment variables for backend application
    deploy:
      mode: replicated
      replicas: 1 # Set this to desired number of tasks
    ports:
      - "7219:80" # Host port should not be clashing with any other port on the machine

  ###################################

  # MSSQL SERVER SERVICE
  # NOTE: FOR PRODUCTION ENVIRONMENT, USE CLOUD MANAGED DATABASES,
THIS MSSQL CONTAINER IS NOT IDEAL FOR PROD ENVIRONMENT, THIS IS ONLY IDEAL FOR DEV ENVIRONMENT OR TESTING
  # I AM USING THIS DB CONTAINER JUST FOR THE PURPOSE OF DEMONSTRATION

  mssqldb:
    image: mcr.microsoft.com/mssql/server:2019-latest # This is a free and lightweight version of mssql, only for dev environment or testing
    environment:
      SA_PASSWORD: "hitherefolks@007" # This is the password for mssql server admin named - 'sa'
      ACCEPT_EULA: "Y" # Accepts the End User License Agreement
    deploy:
      mode: replicated
      replicas: 1 # Set this to desired number of tasks, 1 db is enough for our backend application
    ports:
      - "1433:1433" # Host port should not be clashing with any other port on the machine
    volumes:
      - mssql_data:/var/lib/mssql/data # Volume mounting

volumes:
  mssql_data:
    driver: local
4.2 Create bash script for updating swarm services - "update-services.sh"
The update_service() function checks which version is active, blue or green, and stores the number of replicas in these variables - BLUE_REPLICAS & GREEN_REPLICAS. The function returns exit code 1, if it can't find any replicas greater than 0.
Then for example, if number of blue version replicas is greater than 0, then it updates the green service and vice versa:
- it reads the env variables fron env file line by line (ignoring the comments and empty lines) and stores all the variables in this variable - "NEW_ENV_VARS" in the form of "--env-add key=value"
- it compares the existing env variables with the new ones and stores the variables which are not there in this variable - "ENV_VARS_TO_REMOVE" in the form "--env-rm key"
- it updates the docker image with the latest docker image created during GitHub build
sudo nano update-services.sh
# Paste the below content inside this file and for saving the changes, press Ctrl+O , then press Enter & then Ctrl+X
#!/bin/bash

# This function will fetch all current env values used by inactive service
get_current_env() {
  SERVICE_NAME=$1
  sudo docker service inspect --format '{{range .Spec.TaskTemplate.ContainerSpec.Env}}{{println .}}{{end}}' $SERVICE_NAME
}

# This function will read env file line by line and store the output which will be used later for updating env values in services
load_env_file() {
  ENV_FILE=$1
  NEW_ENV_VARS=""  # Initialize an empty string to accumulate all environment additions
  while IFS= read -r LINE; do
    if [[ -n "$LINE" && "$LINE" != \#* ]]; then  # Check if the line is not empty and not a comment
      KEY=$(echo "$LINE" | cut -d'=' -f1)
      VALUE=$(echo "$LINE" | cut -d'=' -f2-)
      NEW_ENV_VARS+="--env-add $KEY=\"$VALUE\" "  # Append to the string with quoted value
    fi
  done < "$ENV_FILE"
  echo "$NEW_ENV_VARS"  # Print all additions in one line without a newline at the end
}

# This function will compare existing and new env variables and will store the environment variables that are no longer needed as an output,
 which will be used later in service update command
get_env_vars_to_remove() {
  CURRENT_ENV_VARS="$1"
  NEW_ENV_VARS="$2"
  ENV_VARS_TO_REMOVE=""  # Initialize an empty string to accumulate all environment removals

  # Convert string of current env vars into an array
  IFS=$'\n' read -r -d '' -a current_env_array <<< "$CURRENT_ENV_VARS"

  # Loop through each variable in the current environment
  for VAR in "${current_env_array[@]}"; do
    # Check if the current env variable is not in the new env variables
    if ! grep -qF -- "$VAR" <<< "$NEW_ENV_VARS"; then
      KEY=$(echo "$VAR" | cut -d'=' -f1)  # Extract the key part of the environment variable
      ENV_VARS_TO_REMOVE+="--env-rm $KEY "  # Append to the string
    fi
  done
  echo "$ENV_VARS_TO_REMOVE"  # Print all removals in one line without a newline at the end
}

# This function updates the service with new docker image, adds new env variables and removes the unnecessary env variables
update_service () {
  STACK_NAME=$1
  SERVICE_NAME=$2
  NEW_IMAGE=$3
  ENV_FILE=$4

  BLUE_REPLICAS=$(sudo docker service ls --filter name=${STACK_NAME}_${SERVICE_NAME}_blue --format "{{.Replicas}}" | awk -F '/' '{print $1}')
  GREEN_REPLICAS=$(sudo docker service ls --filter name=${STACK_NAME}_${SERVICE_NAME}_green --format "{{.Replicas}}" | awk -F '/' '{print $1}')

  NEW_ENV_VARS=$(load_env_file $ENV_FILE)

  if [ $BLUE_REPLICAS -gt 0 ]; then
    echo "Currently Blue Version Is Active With Replicas-$BLUE_REPLICAS For Service-$SERVICE_NAME"
    echo "Updating Green Version For Service-$SERVICE_NAME With Latest Docker Image and Environment Variables"
    CURRENT_ENV_VARS=$(get_current_env ${STACK_NAME}_${SERVICE_NAME}_green)
    ENV_VARS_TO_REMOVE=$(get_env_vars_to_remove "$CURRENT_ENV_VARS" "$NEW_ENV_VARS")
    cmd="sudo docker service update --with-registry-auth --force --image"
    cmd="$cmd $NEW_IMAGE"
    cmd="$cmd $NEW_ENV_VARS"
    cmd="$cmd $ENV_VARS_TO_REMOVE"
    cmd="$cmd ${STACK_NAME}_${SERVICE_NAME}_green"
    eval $cmd
    echo "This is the updated image name- $NEW_IMAGE"
    echo "Printing Updated Image Which Will Be Used By The New Green Version For Service-$SERVICE_NAME"
    sudo docker service inspect --format '{{.Spec.TaskTemplate.ContainerSpec.Image}}' ${STACK_NAME}_${SERVICE_NAME}_green

  elif [ $GREEN_REPLICAS -gt 0 ]; then
    echo "Currently Green Version Is Active With Replicas-$GREEN_REPLICAS For Service-$SERVICE_NAME"
    echo "Updating Blue Version For Service-$SERVICE_NAME With Latest Docker Image"
    CURRENT_ENV_VARS=$(get_current_env ${STACK_NAME}_${SERVICE_NAME}_blue)
    ENV_VARS_TO_REMOVE=$(get_env_vars_to_remove "$CURRENT_ENV_VARS" "$NEW_ENV_VARS")
    cmd="sudo docker service update --with-registry-auth --force --image"
    cmd="$cmd $NEW_IMAGE"
    cmd="$cmd $NEW_ENV_VARS"
    cmd="$cmd $ENV_VARS_TO_REMOVE"
    cmd="$cmd ${STACK_NAME}_${SERVICE_NAME}_blue"
    eval $cmd
    echo "This is the updated image name- $NEW_IMAGE"
    echo "Printing Updated Image Which Will Be Used By The Blue Version For Service-$SERVICE_NAME"
    sudo docker service inspect --format '{{.Spec.TaskTemplate.ContainerSpec.Image}}' ${STACK_NAME}_${SERVICE_NAME}_blue

  else
    echo "Couldn't Find Any Active Replica For The Service-$SERVICE_NAME"
    exit 1
  fi
}
4.3 Create bash script for blue green deployment - "deploy-app.sh"
Note: These are the lines that needs to change according to your application
# Name of the stack
- stack="app" # enter name of your stack here, it will be used inside the whole script
# List of services and their health check URLs
- services=("frontend" "backend") # write the name of services mentioned in compose file
- health_check_urls_blue=("http://localhost:4200" "http://localhost:7218/swagger/index.html") #write healthcheck url's for frontend blue and backend blue services
- health_check_urls_green=("http://localhost:4201" "http://localhost:7219/swagger/index.html") #write healthcheck url's for frontend green and backend green services
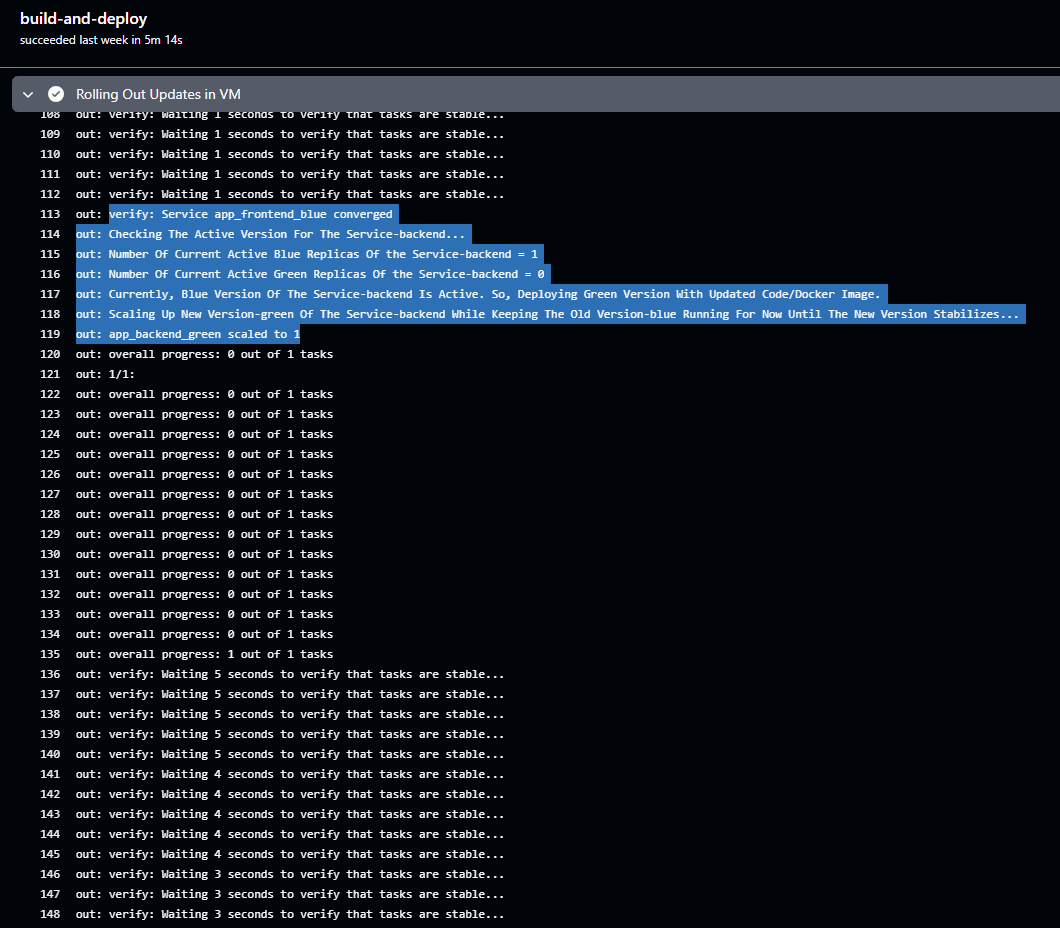
Short Description: The for loop runs for each service in - services=("frontend" "backend") . The loop will store the number of current active blue replicas of the service in this var - "blue_replicas" & the number of current active green replicas of the service in this var - "green_replicas".
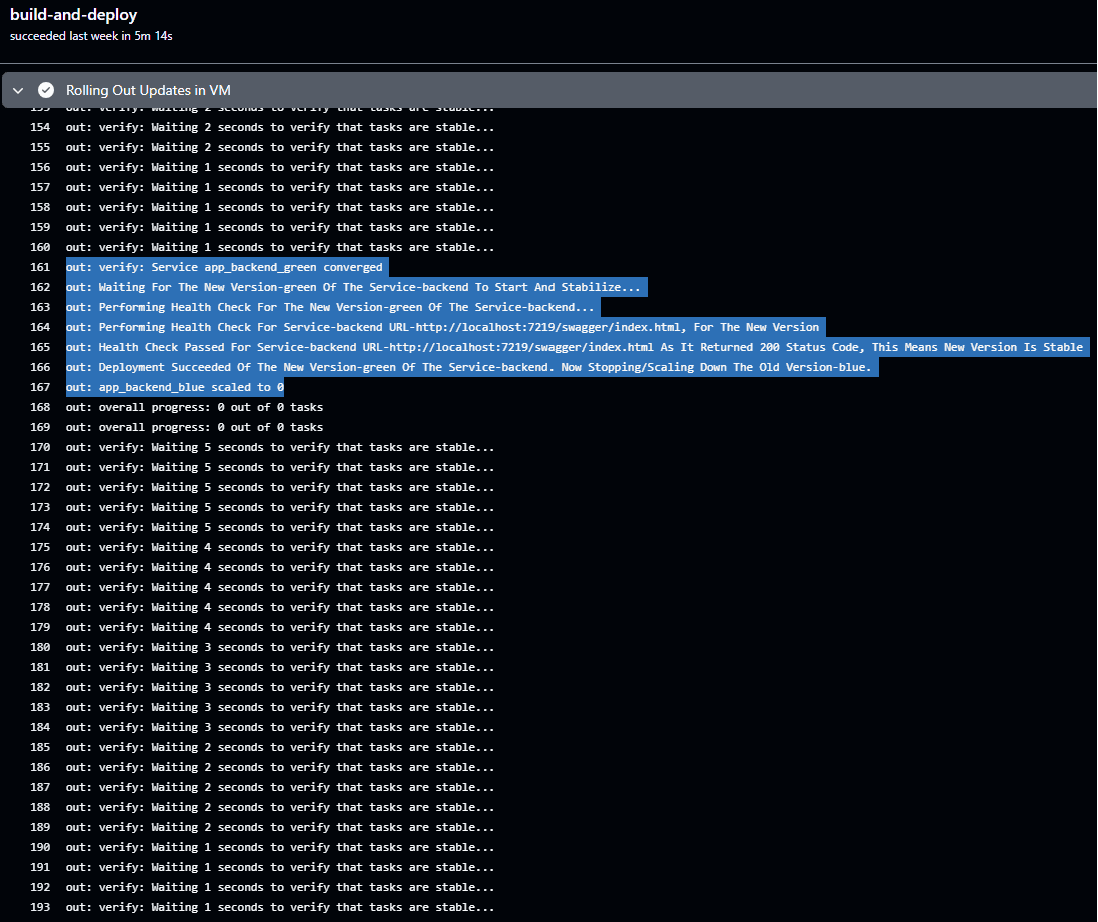
For example, if number of blue replicas are greater than 0, then it scales the green service from 0 to 1, keeping the blue replicas unchanged, so that it keeps on serving client requests. Then it waits for 100 seconds for the green service to stabilize, then it performs the health checks on the urls.
If it passes the health checks then the old blue version is destroyed and if the new version doesn't pass the health checks, then it retries for 5 seconds after every 30 seconds, if it still fails then it scales the new version back to 0.
The loop runs for each service in - services=("frontend" "backend")
sudo nano deploy-app.sh
# Paste the below content inside this file and for saving the changes, press Ctrl+O , then press Enter & then Ctrl+X
#!/bin/bash

# Name of the stack
stack="app"

# List of services and their health check URLs
services=("frontend" "backend")
health_check_urls_blue=("http://localhost:4200" "http://localhost:7218/swagger/index.html")
health_check_urls_green=("http://localhost:4201" "http://localhost:7219/swagger/index.html")

# Declare the associative array for service statuses to ensure that the script manages associative arrays properly
# service_statuses stores the deployment status for each service
declare -A service_statuses

# Function to perform a health check on the deployed version
perform_health_check() {
  url=$1
  echo "Performing Health Check For Service-"$service" URL-"$url", For The New Version"
  for i in {1..5}; do
    status_code=$(curl --write-out "%{http_code}" --silent --output /dev/null "$url")
    if [ "$status_code" -eq 200 ]; then
      echo "Health Check Passed For Service-"$service" URL-"$url" As It Returned 200 Status Code, This Means New Version Is Stable"
      return 0
    else
      echo "Health Check Failed For Service-"$service" URL-"$url", Retrying..."
      sleep 30
    fi
  done
  echo "Health Check Failed For Service-"$service" URL-"$url" After Maximum Number Of Retries. New Version Is Not Stable"
  return 1
}

# Determine the active version and deploy the other version for each service
for i in "${!services[@]}"; do
  service="${services[$i]}"
  echo "Checking The Active Version For The Service-"$service"..."

  blue_replicas=$(sudo docker service ls --filter name=${stack}_${service}_blue --format "{{.Replicas}}" | awk -F '/' '{print $1}')
  green_replicas=$(sudo docker service ls --filter name=${stack}_${service}_green --format "{{.Replicas}}" | awk -F '/' '{print $1}')
  echo "Number Of Current Active Blue Replicas Of the Service-"$service" = $blue_replicas"
  echo "Number Of Current Active Green Replicas Of the Service-"$service" = $green_replicas"

  if [ $blue_replicas -gt 0 ]; then
    echo "Currently, Blue Version Of The Service-"$service" Is Active. So, Deploying Green Version With Updated Code/Docker Image."
    export REPLICAS_BLUE=$blue_replicas
    export REPLICAS_GREEN=1 #Set this to desired number of replicas
    new_version="green"
    old_version="blue"
    health_check_url="${health_check_urls_green[$i]}"
  elif [ $green_replicas -gt 0 ]; then
    echo "Currently, Green Version Of The Service-"$service" Is Active. So, Deploying Blue Version With Updated Code/Docker Image."
    export REPLICAS_BLUE=1 #Set this to desired number of replicas
    export REPLICAS_GREEN=$green_replicas
    new_version="blue"
    old_version="green"
    health_check_url="${health_check_urls_blue[$i]}"
  else
    echo "Currently, Neither Blue Nor Green OR Both Blue & Green Versions Of The Service-"$service"
Is Active. So, Deploying Blue Version As Default With Updated Code/Docker Image."
    export REPLICAS_BLUE=1 #Set this to desired number of replicas
    export REPLICAS_GREEN=0
    new_version="blue"
    old_version="green"
    health_check_url="${health_check_urls_blue[$i]}"
  fi

  # Scale up the new version while keeping the old version running
  echo "Scaling Up New Version-"$new_version" Of The Service-"$service" While Keeping The Old Version-"$old_version" Running For Now Until The New Version Stabilizes..."
  sudo docker service scale ${stack}_${service}_$new_version=1 #Set this to desired number of replicas

  # Wait for the new version to start
  echo "Waiting For The New Version-"$new_version" Of The Service-"$service" To Start And Stabilize..."
  sleep 100

  # Perform health check for the service
  echo "Performing Health Check For The New Version-"$new_version" Of The Service-"$service"..."
  perform_health_check $health_check_url
  if [ $? -eq 0 ]; then
    echo "Deployment Succeeded Of The New Version-"$new_version" Of The Service-"$service". Now Stopping/Scaling Down The Old Version-"$old_version"."
    sudo docker service scale ${stack}_${service}_${old_version}=0
    service_statuses[$service]="NEW VERSION DEPLOYED SUCCESSFULLY !!!"
  else
    echo "Deployment Failed Of The New Version-"$new_version" Of The Service-"$service". Now Rolling Back To The Previous Version."
    sudo docker service scale ${stack}_${service}_${new_version}=0
    service_statuses[$service]="NEW VERSION DEPLOYMENT FAILED !!! ROLLED BACK TO PREVIOUS STABLE VERSION"
  fi
done

# Print final status of each service
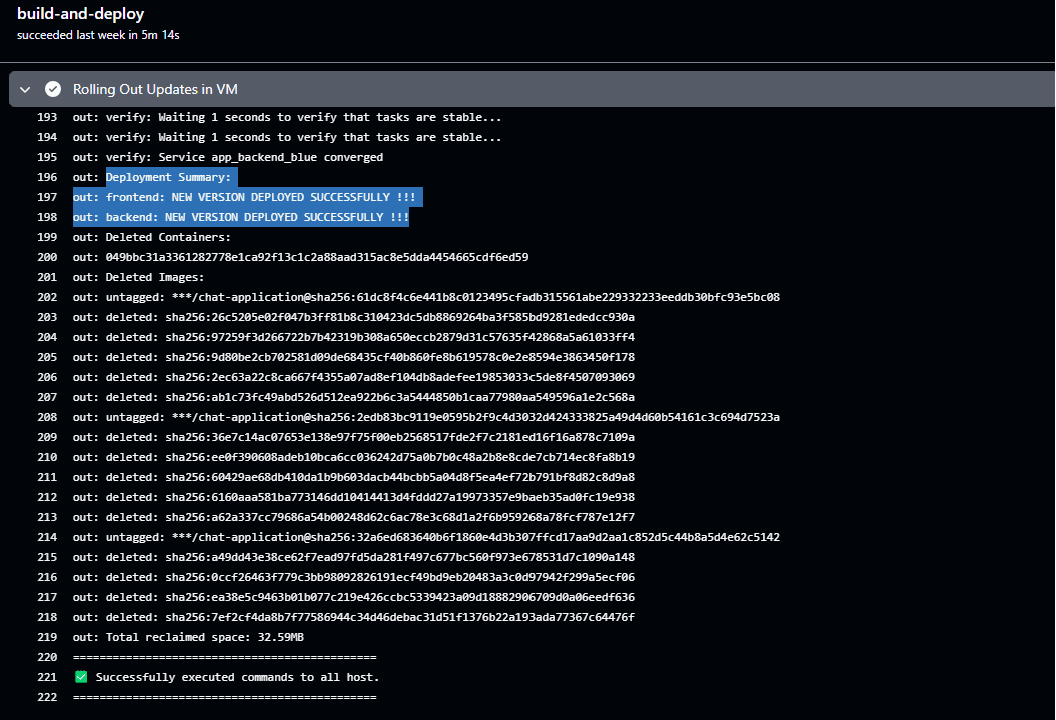
echo "Deployment Summary:"
for service in "${!service_statuses[@]}"; do
  echo "$service: ${service_statuses[$service]}"
done
4.4 Create env file for storing environment variables required for frontend services
nano fe.env
# Paste the below content inside this file and for saving the changes, press Ctrl+O , then press Enter & then Ctrl+X
Environment=Development4.5 Create env file for storing environment variables required for backend services
nano be.env
# Paste the below content inside this file and for saving the changes, press Ctrl+O , then press Enter & then Ctrl+X
# This file contains appsettings/env variables required to run backend project,
it should not be pushed to github, I've pushed it just for the purpose of demonstration, you can store the exact file in a github secret for securely passing these to
VM through the github workflow

AppSettings__Token=It Is A Secret Key Which Should Not Be Shared With Other Users.....
AllowedHosts=*
Google__ClientId=207214300515-nk7v3nf72f9sqlqo0f2s54bkumof77n2.apps.googleusercontent.com
Google__ClientSecret=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
ASPNETCORE_ENVIRONMENT=Development

# IF YOUR SQL DATABASE IS DEPLOYED THROUGH DOCKER STACK DEPLOY COMMAND, THEN CONNECTION STRING FORMAT WOULD BE:
# ConnectionStrings__RealTimeChatDbContext=Server=<stackname>_<servicename>,1433;Database=<dbname>;User Id=<username>;]
Password=<password>;Encrypt=True;TrustServerCertificate=True
ConnectionStrings__RealTimeChatDbContext=Server=app_mssqldb,1433;Database=RealTimeChatDb;User Id=sa;
Password=hitherefolks@007;Encrypt=True;TrustServerCertificate=True

# IF YOU HAVE EXTERNAL SQL DATABASE THEN CONNECTION STRING FORMAT WOULD BE :
# ConnectionStrings__RealTimeChatDbContext=Server=<server_name/server_ip>,1433;Database=<dbname>;
User Id=<username>;Password=<password>;Encrypt=True;TrustServerCertificate=True

# IF YOU WILL DEPLOY SQL DATABASE AS DOCKER CONTAINER THEN CONNECTION STRING FORMAT WOULD BE:
# ConnectionStrings__RealTimeChatDbContext=Server=<container_name>,1433;Database=<dbname>;
User Id=<username>;Password=<password>;Encrypt=True;TrustServerCertificate=True
The application directory should have these files in the end

5. Authenticate into docker registry
If you are using any cloud managed registry to store docker images like GCP Artifact Registry, AWS ECR, etc, then you need to authenticate. For this demonstration, I have used dockerhub public repository, so I do not need to authenticate.
6. Deploy the whole stack for the first time
- Go to the directory where the compose file is present -> cd application
- Run this command to deploy stack -> sudo docker stack deploy -c <compose_file_name> -d --with-registry-auth <stack name>
sudo docker stack deploy -c docker-compose-server-bluegreen.yml -d --with-registry-auth app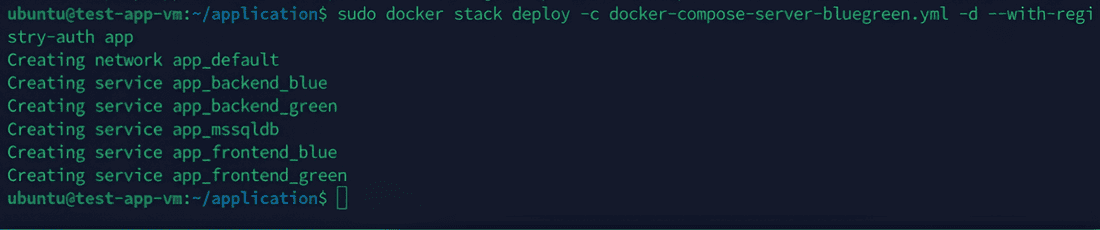
6.1 Check the status of all services
sudo docker service ls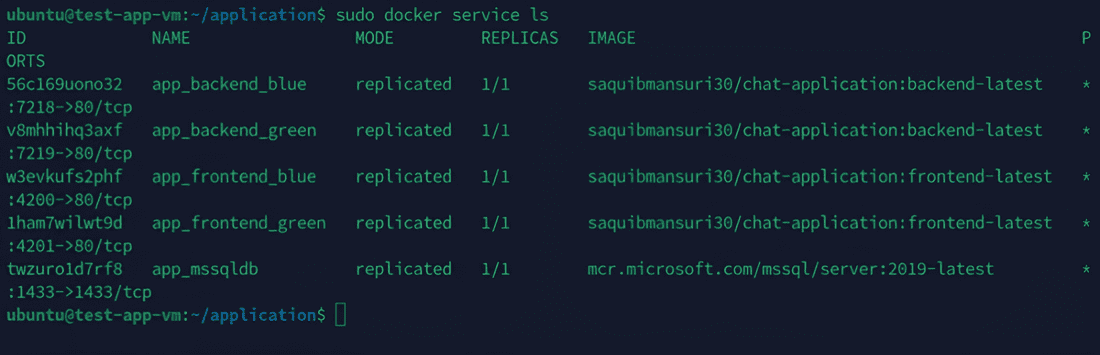
6.2 Check the status of the containers started by the services
sudo docker ps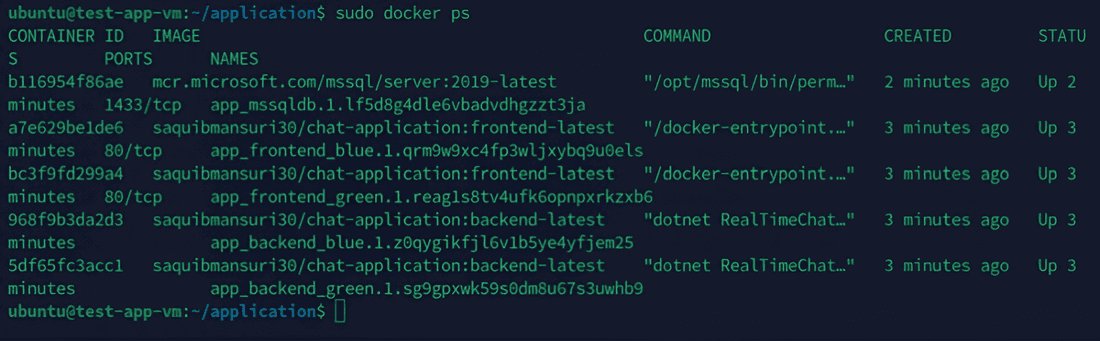
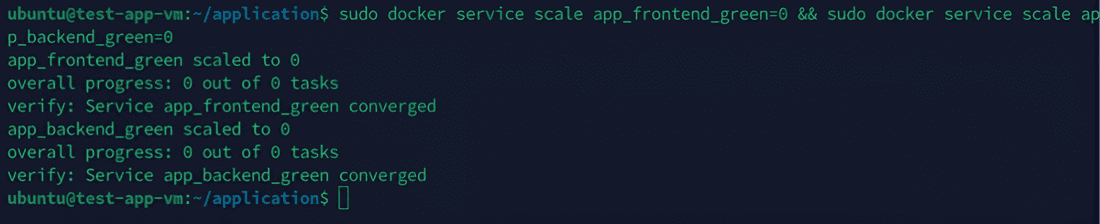
7. Stop one frontend & one backend service manually
Note: This is necessary as the update-services.sh script will identify which service is active and then it would update the inactive service with the new docker image and env variables.
sudo docker service scale <stack_name>_<service_name>=0 && sudo docker service scale <stack_name>_<service_name>=0
sudo docker service scale app_frontend_green=0 && sudo docker service scale app_backend_green=0
8. Install, start and enable Nginx
Note: I have used nginx, you can also use any other webserver like Apache.
sudo apt install -y nginx
sudo systemctl start nginx
sudo systemctl enable nginx

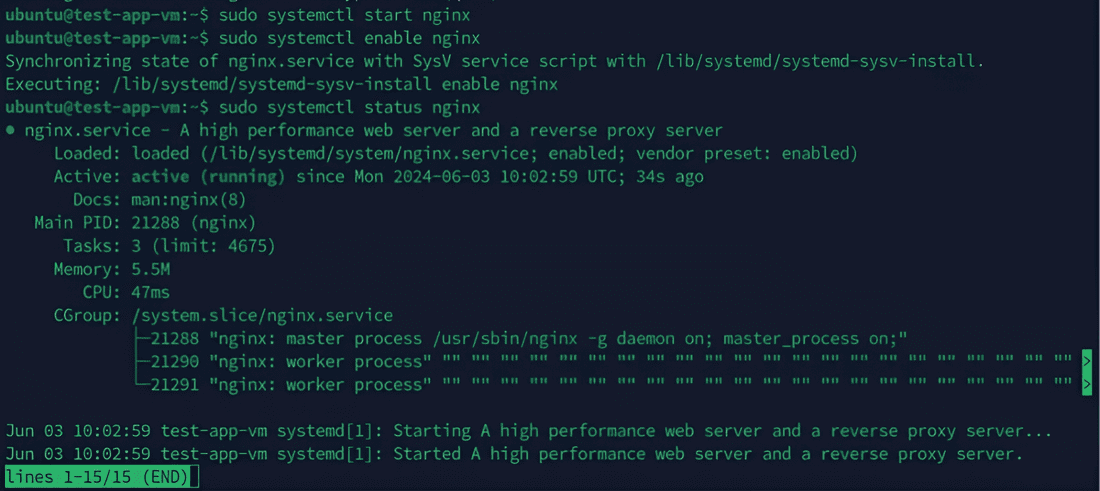
# Verify nginx service status
sudo systemctl status nginx
9. Install Certbot
Note: Use this only if https is required. You can manage ssl externally through places like Cloudflare as well.
sudo snap install --classic certbot
sudo ln -s /snap/bin/certbot /usr/bin/certbot

10. Setup nginx config files for reverse proxy
cd /etc/ninx/sites-available10.1 Setup frontend config file
sudo nano frontend
# Paste the below content inside this file and for saving the changes, press Ctrl+O , then press Enter & then Ctrl+X
upstream frontend {
    server localhost:4200;
    server localhost:4201;
    # add more if any
}

server {
    server_name chatfe.saquib.publicvm.com; #this should be the frontend url on we want to access the application

    location / {
        proxy_pass http://frontend;
        proxy_set_header Host $host;
        proxy_set_header X-Real-IP $remote_addr;
        proxy_set_header X-Forwarded-For $proxy_add_x_forwarded_for;
        proxy_set_header X-Forwarded-Proto $scheme;
    }
}
10.2 Setup backend config file
sudo nano backend
# Paste the below content inside this file and for saving the changes, press Ctrl+O , then press Enter & then Ctrl+X
upstream backend {
    server localhost:7218;
    server localhost:7219;
    # add more if any
}

server {
    server_name chatbe.saquib.publicvm.com; #this should be the backend url on we want to access the application

    location / {
        proxy_pass http://backend;
        proxy_set_header Host $host;
        proxy_set_header X-Real-IP $remote_addr;
        proxy_set_header X-Forwarded-For $proxy_add_x_forwarded_for;
        proxy_set_header X-Forwarded-Proto $scheme;
    }
}
10.3 Link sites-available directory with sites-enabled directory
sudo ln -s /etc/nginx/sites-available/* /etc/nginx/sites-enabled/11. Setup SSL certificates
Note: Before doing this step make sure to create 'A' type DNS records on your DNS management portal
Record 1
- Name: chatfe.saquib.publicvm.com
- Value: <virtual machine public ip>
Record 2
- Name: chatbe.saquib.publicvm.com
- Value: <virtual machine public ip>
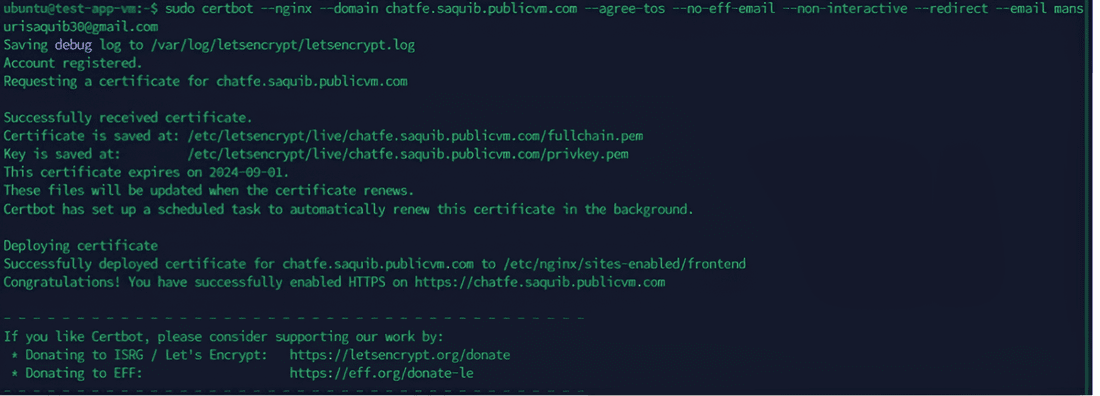
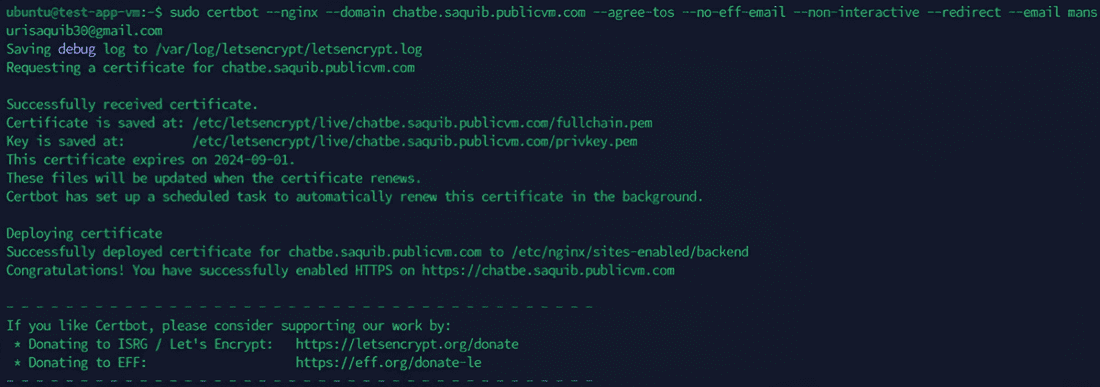
sudo certbot --nginx --domain chatfe.saquib.publicvm.com --agree-tos --no-eff-email --non-interactive --redirect --email mansurisaquib30@gmail.com
sudo certbot --nginx --domain chatbe.saquib.publicvm.com --agree-tos --no-eff-email --non-interactive --redirect --email mansurisaquib30@gmail.com
12. Reload NGINX To Apply The Changes
sudo systemctl reload nginxSetup Workflow On GitHub for CI/CD
Note: Add these secrets in the GitHub repositories as these will be used by the GitHub workflow
- DOCKERHUB_USERNAME - this is the docker hub username
- DOCKERHUB_TOKEN - this is the token that can be created inside dockerhub account settings
- VM_IP - this is the vm pubic ip
- VM_SSH_KEY - this is the private key for doing ssh
- BACKEND_ENVIRONMENT_VARIABLES - everytime before the build, copy and paste whole frontend env file content i.e fe.env in this
- FRONTEND_ENVIRONMENT_VARIABLES - everytime before the build, copy and paste whole backend env file content i.e be.env in this
# Clone your project repository , I am cloning mine for the demo from github
git clone https://github.com/saquibmansuri/Chat-Application
# Create one file in this location ->  .github/workflows/deploy-app.yml
# Paste the below content inside this file and for saving the changes, press Ctrl+O , then press Enter & then Ctrl+X
# DEPLOYING BACKEND & FRONTEND ON LINUX VIRTUAL MACHINE WITH BLUE GREEN DEPLOYMENT STRATEGY

name: Deploy Backend & Frontend

on:
  workflow_dispatch:
  push:
    branches: [ main ]
env:
  DOCKER_REPOSITORY: chat-application  #Enter your repository name here
  VM_SSH_PORT: 22
  IMAGE_TAG: ${{ github.sha }}

jobs:
  build-and-deploy:
    runs-on: ubuntu-latest

    steps:
      - name: Checkout
        uses: actions/checkout@v4

      - name: Setup .NET Core For Backend
        uses: actions/setup-dotnet@v4
        with:
          dotnet-version: "7.0.x"  #Make sure to specify the correct version of your dotnet project

      - name: Login to Docker Hub
        uses: docker/login-action@v3
        with:
          username: ${{ secrets.DOCKERHUB_USERNAME }}
          password: ${{ secrets.DOCKERHUB_TOKEN }}  # This token can be created from dockerhub account settings

      - name: Build, Tag and Push Backend Docker Image to DockerHub Repository
        id: build-image-backend
        run: |
          docker build -t ${{ secrets.DOCKERHUB_USERNAME }}/${{ env.DOCKER_REPOSITORY }}:backend-${{ env.IMAGE_TAG }} -t ${{ secrets.DOCKERHUB_USERNAME }}
/${{ env.DOCKER_REPOSITORY }}:backend-latest -f Backend/backend.Dockerfile .
          docker push ${{ secrets.DOCKERHUB_USERNAME }}/${{ env.DOCKER_REPOSITORY }}:backend-${{ env.IMAGE_TAG }}
          docker push ${{ secrets.DOCKERHUB_USERNAME }}/${{ env.DOCKER_REPOSITORY }}:backend-latest
          echo "backendimage=${{ secrets.DOCKERHUB_USERNAME }}/${{ env.DOCKER_REPOSITORY }}:backend-${{ env.IMAGE_TAG }}" >> $GITHUB_OUTPUT

      - name: Build, Tag and Push Frontend Docker Image to DockerHub Repository
        id: build-image-frontend
        run: |
          docker build -t ${{ secrets.DOCKERHUB_USERNAME }}/${{ env.DOCKER_REPOSITORY }}:frontend-${{ env.IMAGE_TAG }} -t ${{ secrets.DOCKERHUB_USERNAME }}
/${{ env.DOCKER_REPOSITORY }}:frontend-latest -f Frontend/frontend.Dockerfile .
          docker push ${{ secrets.DOCKERHUB_USERNAME }}/${{ env.DOCKER_REPOSITORY }}:frontend-${{ env.IMAGE_TAG }}
          docker push ${{ secrets.DOCKERHUB_USERNAME }}/${{ env.DOCKER_REPOSITORY }}:frontend-latest
          echo "frontendimage=${{ secrets.DOCKERHUB_USERNAME }}/${{ env.DOCKER_REPOSITORY }}:frontend-${{ env.IMAGE_TAG }}" >> $GITHUB_OUTPUT

      - name: Updating Env Variables From Github Secrets Into Backend Env File On VM
        uses: appleboy/ssh-action@v0.1.7
        with:
          host: ${{ secrets.VM_IP }}
          username: "ubuntu"
          key: ${{ secrets.VM_SSH_KEY }}
          port: ${{ env.VM_SSH_PORT }}
          script: |
            cd application
            # Update environment variables for backend project inside this github secret before running the pipeline
            echo "${{ secrets.BACKEND_ENVIRONMENT_VARIABLES }}" > /home/ubuntu/application/be.env

      - name: Updating Env Variables From Github Secrets Into Frontend Env File On VM
        uses: appleboy/ssh-action@v0.1.7
        with:
          host: ${{ secrets.VM_IP }}
          username: "ubuntu"
          key: ${{ secrets.VM_SSH_KEY }}
          port: ${{ env.VM_SSH_PORT }}
          script: |
            cd application
            # Update environment variables for frontend project inside this github secret before running the pipeline
            echo "${{ secrets.FRONTEND_ENVIRONMENT_VARIABLES }}" > /home/ubuntu/application/fe.env

      - name: Update Docker Image And Environment Variables For The Backend Swarm Services In VM
        uses: appleboy/ssh-action@v0.1.7
        with:
          host: ${{ secrets.VM_IP }}
          username: "ubuntu"
          key: ${{ secrets.VM_SSH_KEY }}
          port: ${{ env.VM_SSH_PORT }}
          script: |
            cd application
            source update-services.sh
            # The following line will call the update_service function inside the update-services.sh
            # Syntax-  update_service "<stack_name>" "<service_name>" "<image_name>" "<env_file_name>"
            update_service "app" "backend" "${{ steps.build-image-backend.outputs.backendimage }}" "be.env"

      - name: Update Docker Image And Environment Variables For The Frontend Swarm Services In VM
        uses: appleboy/ssh-action@v0.1.7
        with:
          host: ${{ secrets.VM_IP }}
          username: "ubuntu"
          key: ${{ secrets.VM_SSH_KEY }}
          port: ${{ env.VM_SSH_PORT }}
          script: |
            cd application
            source update-services.sh
            # The following line will call the update_service function inside the update-services.sh
            # Syntax-  update_service "<stack_name>" "<service_name>" "<image_name>" "<env_file_name>"
            update_service "app" "frontend" "${{ steps.build-image-frontend.outputs.frontendimage }}" "fe.env"

      - name: Rolling Out Updates in VM
        uses: appleboy/ssh-action@v0.1.7
        with:
          host: ${{ secrets.VM_IP }}
          username: "ubuntu"
          key: ${{ secrets.VM_SSH_KEY }}
          port: ${{ env.VM_SSH_PORT }}
          script: |
            cd application
            # This script will deploy the new version for both frontend and backend, verify healthcheck and rollback if healthcheck fails
            sudo chmod +x deploy-app.sh
            sudo ./deploy-app.sh
            sudo docker system prune -af
# Stage the changes
git add .
# Commit the changes
git commit -m "Adds workflow"
# Push the changes
git push
Pipeline Execution
1. Check status before workflow execution
Note: Do this to verify the results after workflow execution. Currently, frontend_blue and backend_blue is active, so after successful deployment of new version, frontend_green and backend_green should be active and frontend_blue and backend_blue should be inactive.
sudo docker service ls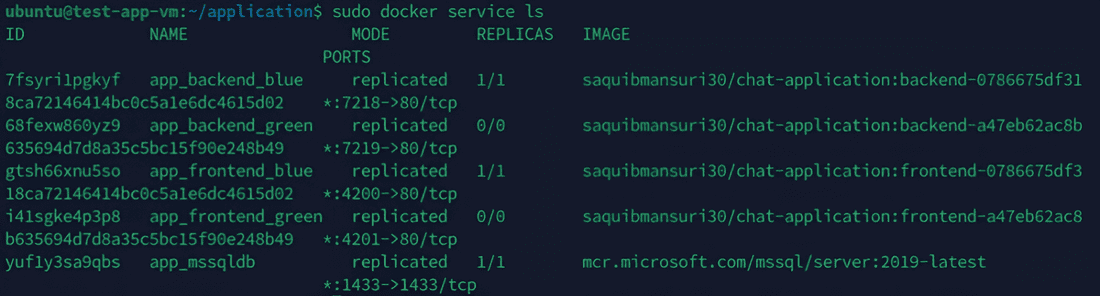
2. Execute workflow
Here's my workflow build URL for more details
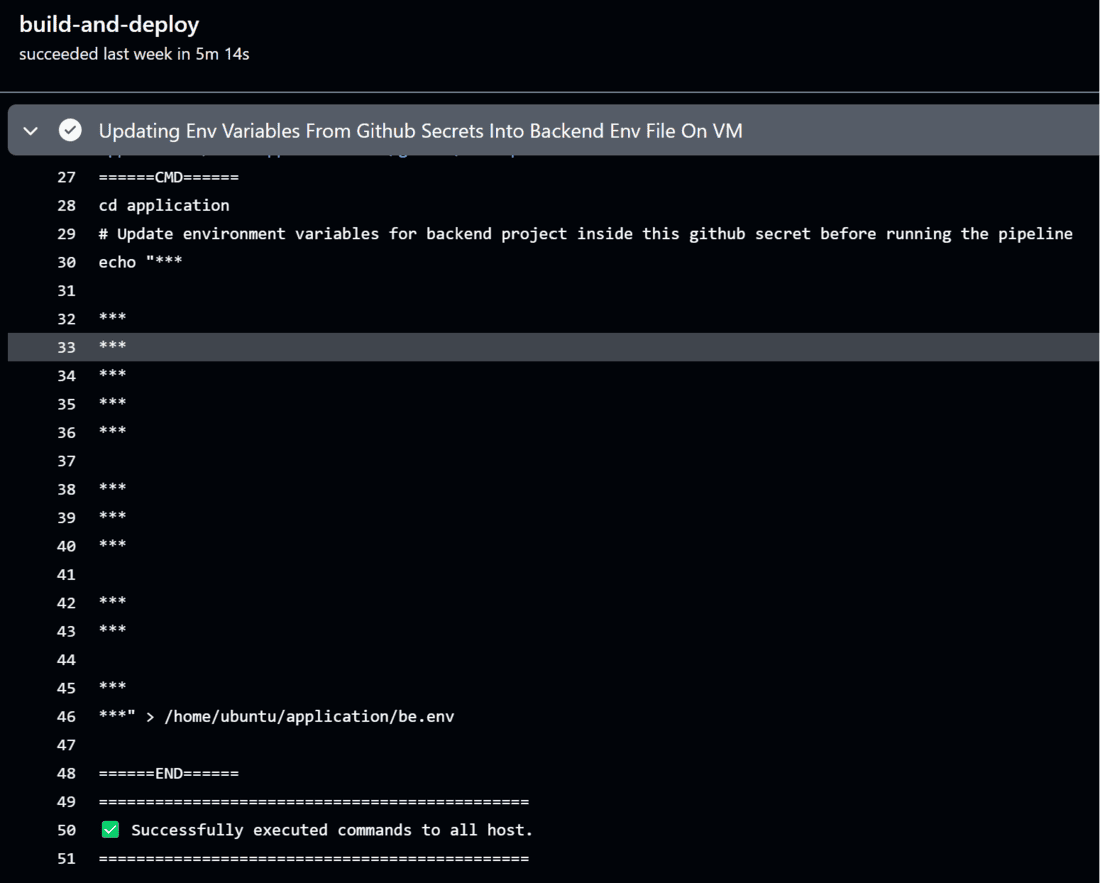
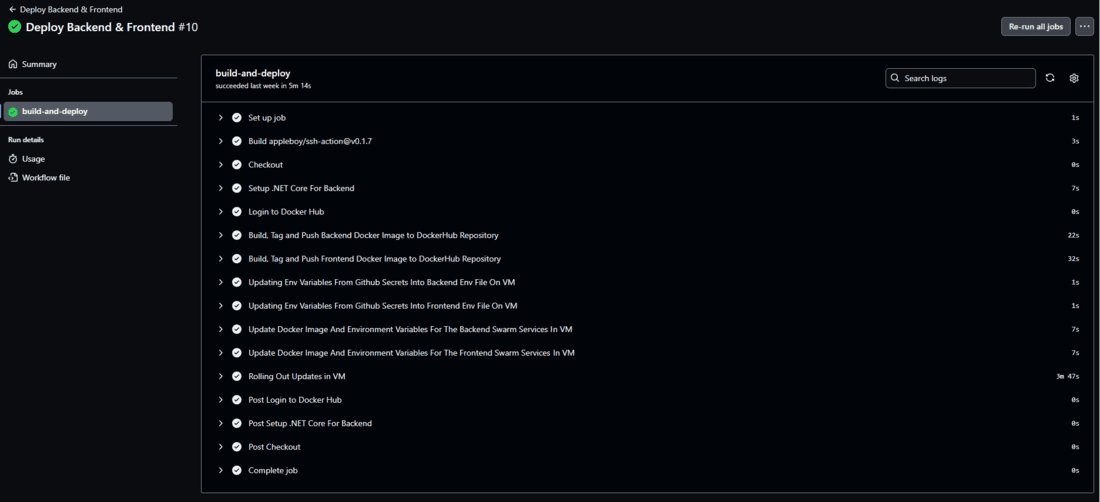
https://github.com/saquibmansuri/Chat-Application/actions/runs/9364543902/job/25777761011Note: The are the screenshots of the main steps written inside the workflow.
Step 1: Updating env variables from GitHub secrets into backend env file on virtual machine.
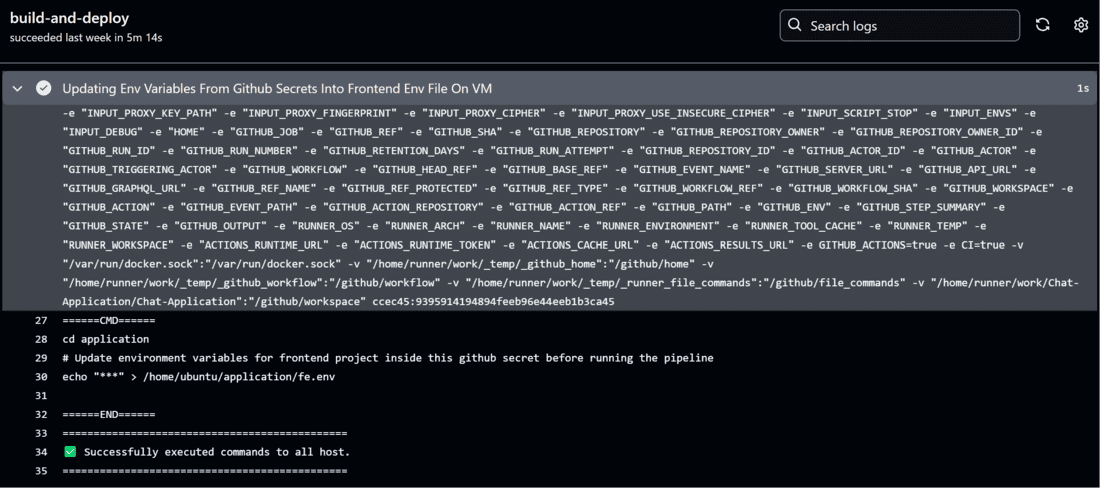
Step 2: Updating env variables from GitHub secrets into frontend env file on virtual machine.
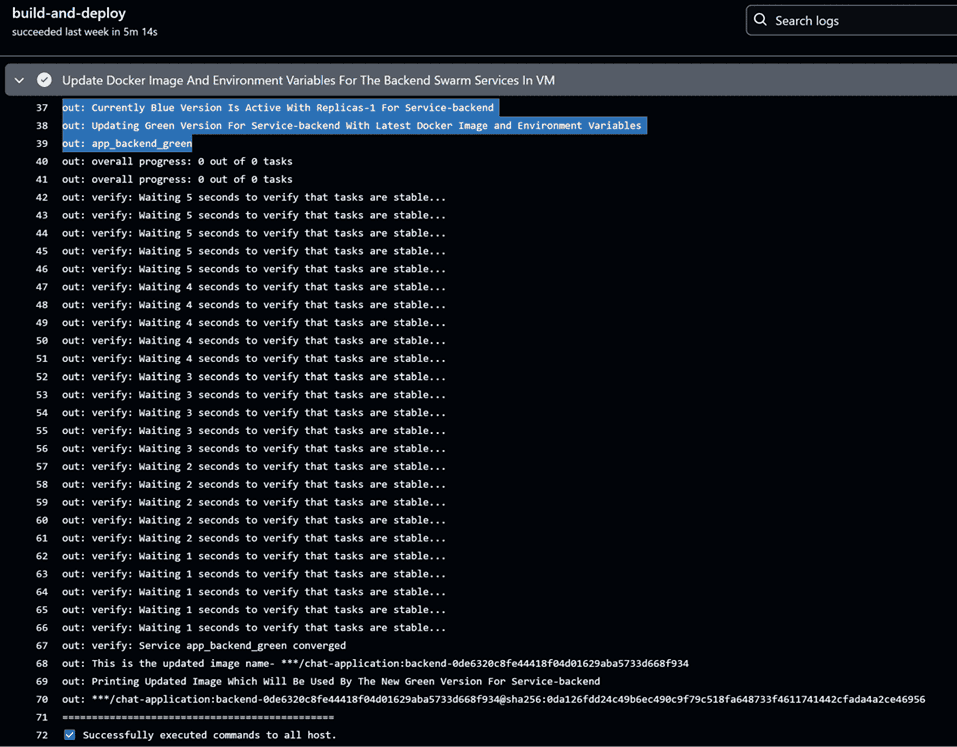
Step 3: Update docker image and environment variables for the backend swarm services in virtual machine.
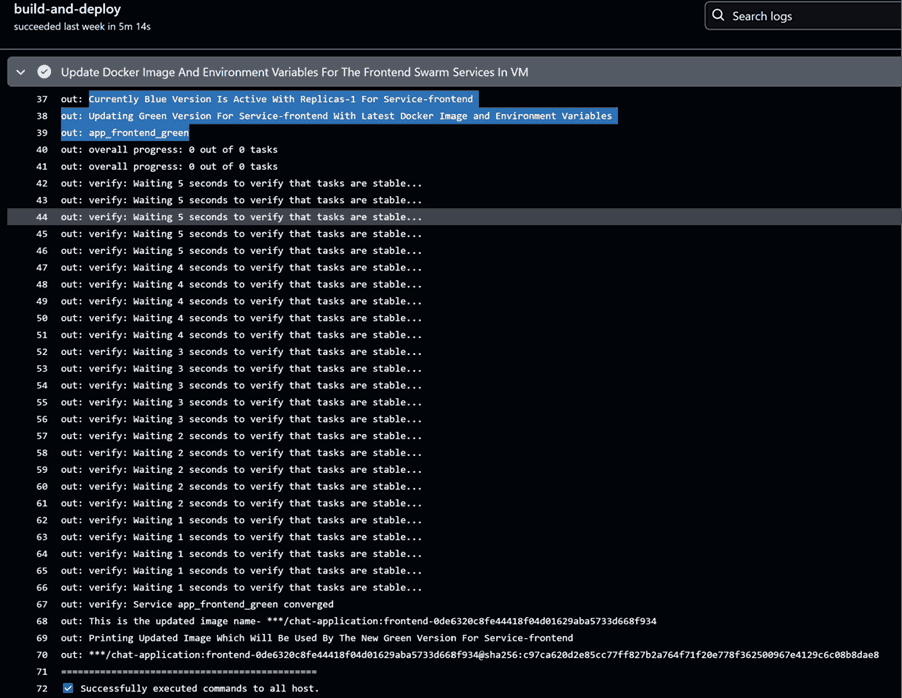
Step 4: Update docker image and environment variables for the frontend swarm services in virtual machine.
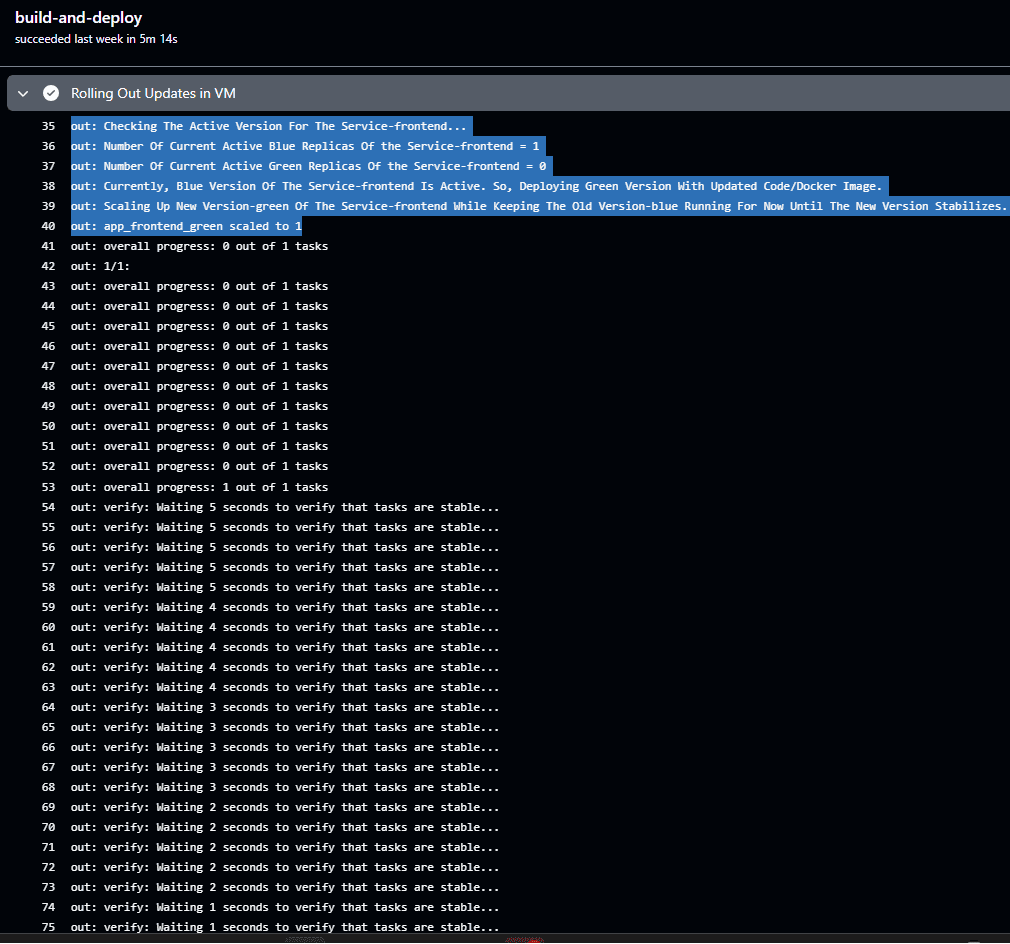
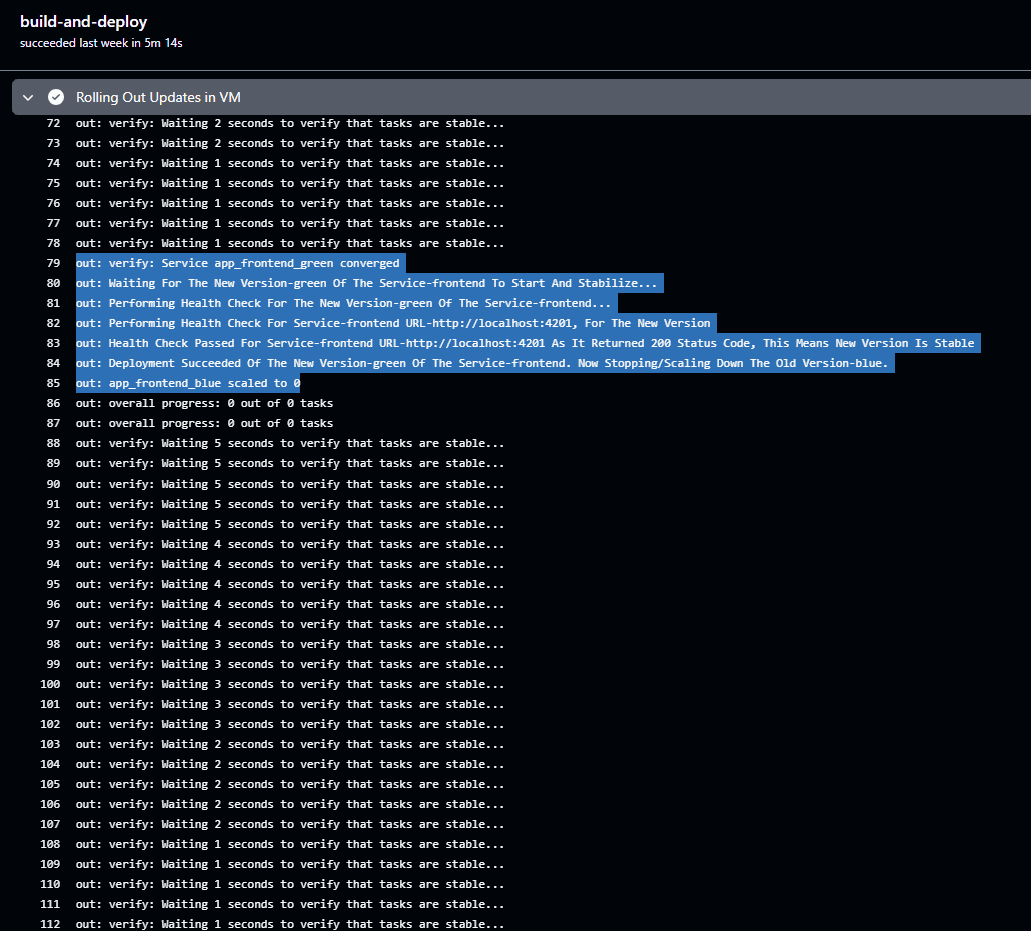
Step 5: Rolling out updates in virtual machine.
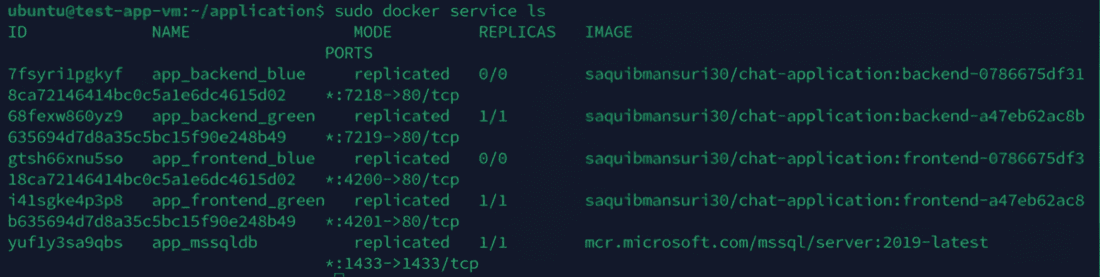
3. Check status after workflow execution
After successful deployment of new version, frontend_green and backend_green are active and frontend_blue and backend_blue are inactive.
Access the application
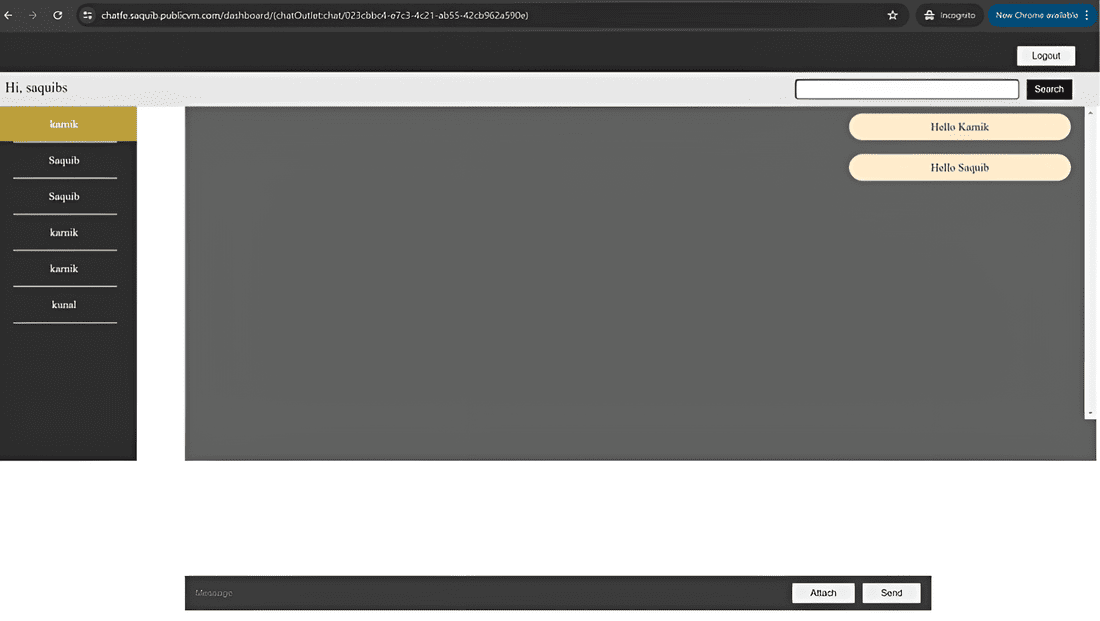
Note: In this approach, the application never goes down as there is always one stable version of frontend and backend for handling the user requests while the new version deploys in the background.
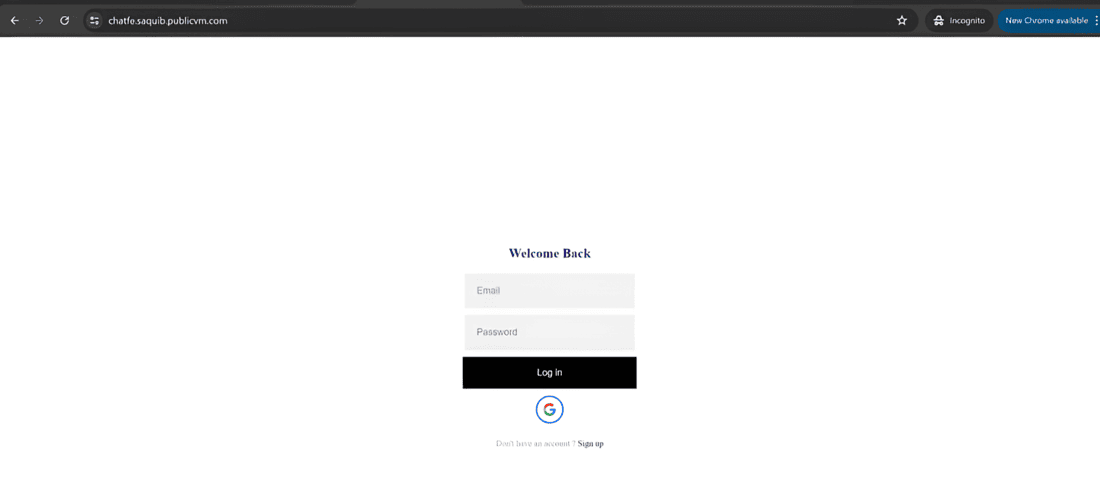
Frontend URL – https://chatfe.saquib.publicvm.com
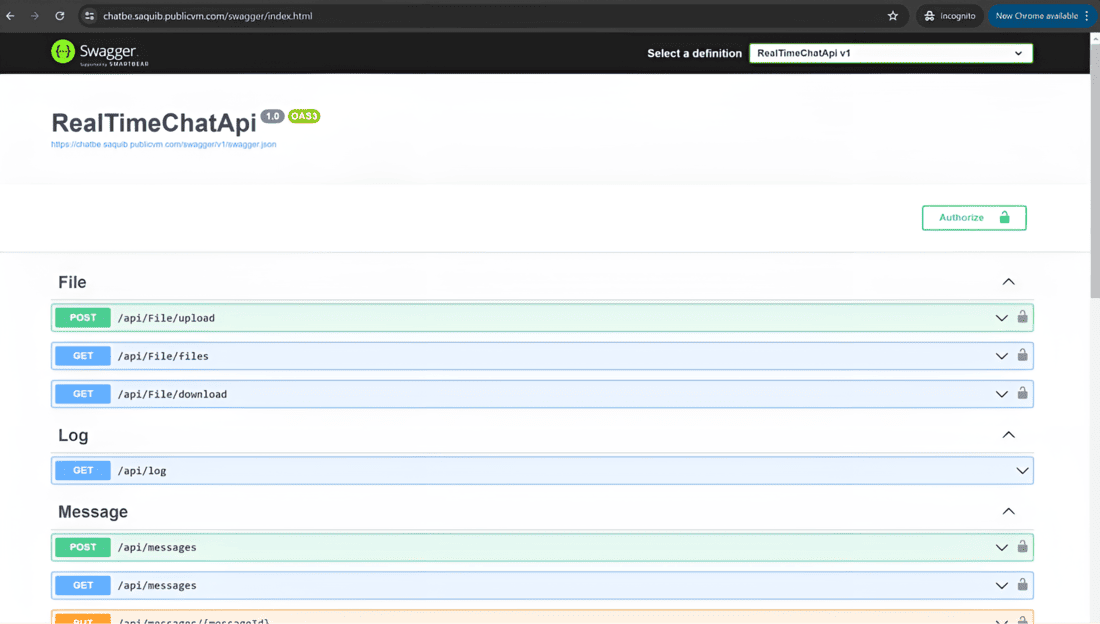
Backend Swagger URL – https://chatbe.saquib.publicvm.com/swagger/index.html
Frontend Login/Signup Page
Backend dotnet swagger UI
Bonus tip
Notify team members on Microsoft teams about the deployment summary, after the script execution is complete, then it will send a notification of the deployment summary inside the teams channel.
# Create a channel on teams and get the webhook url from channel settings
# Add this part at the end of deploy-app.sh script
# -- Webhook Notification Start --
# Prepare JSON payload for webhook notification
json_payload="{\"text\": \"Environment Name: $stack"
for service in "${!service_statuses[@]}"; do
  json_payload+="  ||  \\n$service: ${service_statuses[$service]}"
done
json_payload+="\"}"

# Send JSON payload to webhook
echo "Notifying On Teams"
curl -H "Content-Type: application/json" -d "$json_payload" <webhook_url>
# -- Webhook Notification End --
Conclusion
In this article, we explored one way of implementing blue-green deployment strategy using Docker Swarm, demonstrating the setup of a sample application with a single compose file and NGINX as a reverse proxy webserver. Moreover, we configured a CI/CD pipeline on GitHub to automate the deployment process, ensuring seamless transitions. This practical approach showcases how Docker Swarm can facilitate robust, scalable deployments, empowering DevOps teams to maintain high availability and streamline updates effectively.