

The Canny Edge Detector is a popular edge detection algorithm used to identify the boundaries of objects in an image. It detects edges by finding areas with significant changes in pixel intensity while reducing the effect of noise.
- Detects edges with high accuracy.
- Reduces noise before edge detection.
- Produces thin and well-defined edges.
- Minimizes false edge detection.
- Widely used in image processing and computer vision applications.
Working of Canny Edge Detection
The Canny Edge Detection algorithm consists of the following stages:
1. Noise Reduction Using a Gaussian Filter
To prevent false detection caused by image noise, the algorithm first applies a Gaussian blur. This smoothes out minor intensity variations making true edges more prominent.
- The Gaussian kernel used is typically 5×55×5 with a standard deviation (
\sigma ) of 1.4 - The kernel must be normalized so its values sum to 1.
- The equation for Gaussian filter kernel is:
G_\sigma = \frac{1}{2\pi\sigma^2} e^{-\frac{x^2 + y^2}{2\sigma^2}}
2. Gradient Calculation
The algorithm calculates the intensity gradients in both horizontal and vertical directions to determine the strength and direction of edges.
3. Non-Maximum Suppression
To refine the edge map and thin the edges to one-pixel width, non-maximum suppression identifies and keeps only those pixels at the local maxima (in the gradient direction), suppressing all others.
- Each pixel is compared along the gradient direction with its neighbours.
- If a neighbouring pixel has a greater gradient magnitude, the current pixel is suppressed (set to zero).
4. Double Thresholding
Two threshold values are applied:
- Strong edges are retained.
- Weak edges are marked for further evaluation.
- Non-edge pixels are discarded.
5. Edge Tracking by Hysteresis
Weak edges connected to strong edges are preserved, while isolated weak edges are removed. This helps produce continuous and accurate edges.
Implementation of the Canny Edge Detection
Step 1: Import libraries
- NumPy: For array operations.
- OpenCV: For image processing functions.
- Matplotlib: For displaying images.
import numpy as np
import cv2
import matplotlib.pyplot as plt
Step 2: Define Canny_detector Function
- Color images are converted to grayscale, as edge detection operates on intensity changes.
- A Gaussian blur smooths the image to reduce the impact of noise which might otherwise produce false edges.
- Computes horizontal (x-direction) and vertical (y-direction) intensity gradients using Sobel operators.
- Converts these to magnitude and angle for each pixel.
- Initializes "weak" and "strong" edge thresholds as fractions of the maximum magnitude found.
- Classifies pixels as strong edges, weak edges or non-edges based on the calculated thresholds.
def Canny_detector(img, weak_th=None, strong_th=None):

    img = cv2.cvtColor(img, cv2.COLOR_BGR2GRAY)

    img = cv2.GaussianBlur(img, (5, 5), 1.4)

    gx = cv2.Sobel(np.float32(img), cv2.CV_64F, 1, 0, 3)
    gy = cv2.Sobel(np.float32(img), cv2.CV_64F, 0, 1, 3)

    mag, ang = cv2.cartToPolar(gx, gy, angleInDegrees=True)

    height, width = img.shape

    mag_max = np.max(mag)
    if weak_th is None:
        weak_th = mag_max * 0.1
    if strong_th is None:
        strong_th = mag_max * 0.5


    nms = np.zeros_like(mag)

    for i_x in range(1, width-1):
        for i_y in range(1, height-1):

            grad_ang = ang[i_y, i_x]
            grad_ang = grad_ang % 180

            if (0 <= grad_ang < 22.5) or (157.5 <= grad_ang <= 180):
                before = mag[i_y, i_x - 1]
                after  = mag[i_y, i_x + 1]

            elif (22.5 <= grad_ang < 67.5):
                before = mag[i_y - 1, i_x + 1]
                after  = mag[i_y + 1, i_x - 1]

            elif (67.5 <= grad_ang < 112.5):
                before = mag[i_y - 1, i_x]
                after  = mag[i_y + 1, i_x]

            else:  # 112.5 - 157.5
                before = mag[i_y - 1, i_x - 1]
                after  = mag[i_y + 1, i_x + 1]

            if mag[i_y, i_x] >= before and mag[i_y, i_x] >= after:
                nms[i_y, i_x] = mag[i_y, i_x]
            else:
                nms[i_y, i_x] = 0

    result = np.zeros_like(nms)

    strong = 255
    weak = 75

    for i_x in range(width):
        for i_y in range(height):
            val = nms[i_y, i_x]

            if val >= strong_th:
                result[i_y, i_x] = strong
            elif val >= weak_th:
                result[i_y, i_x] = weak
            else:
                result[i_y, i_x] = 0

    return result
Step 3: Load and Check the Input Image
- Reads the target image file.
- Checks if the file loads successfully to prevent errors later.
You can download the sample image from here.
frame = cv2.imread('sample.jpeg')
if frame is None:
    print("Error: image not found! Please check the path.")
Step 4: Apply Canny Edge Detection
Calls the Canny_detector function to process the image and obtain the edge map.
canny_img = Canny_detector(frame)
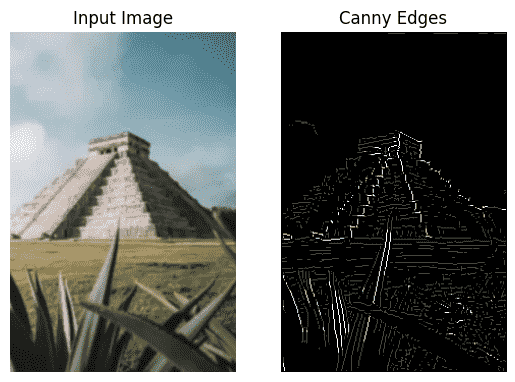
Step 5: Visualize Results
plt.subplot(1, 2, 1)
plt.title('Input Image')
plt.imshow(cv2.cvtColor(frame, cv2.COLOR_BGR2RGB))
plt.axis('off')
plt.subplot(1, 2, 2)
plt.title('Canny Edges')
plt.imshow(canny_img, cmap='gray')
plt.axis('off')
plt.show()
Output:
You can download the source code from here.